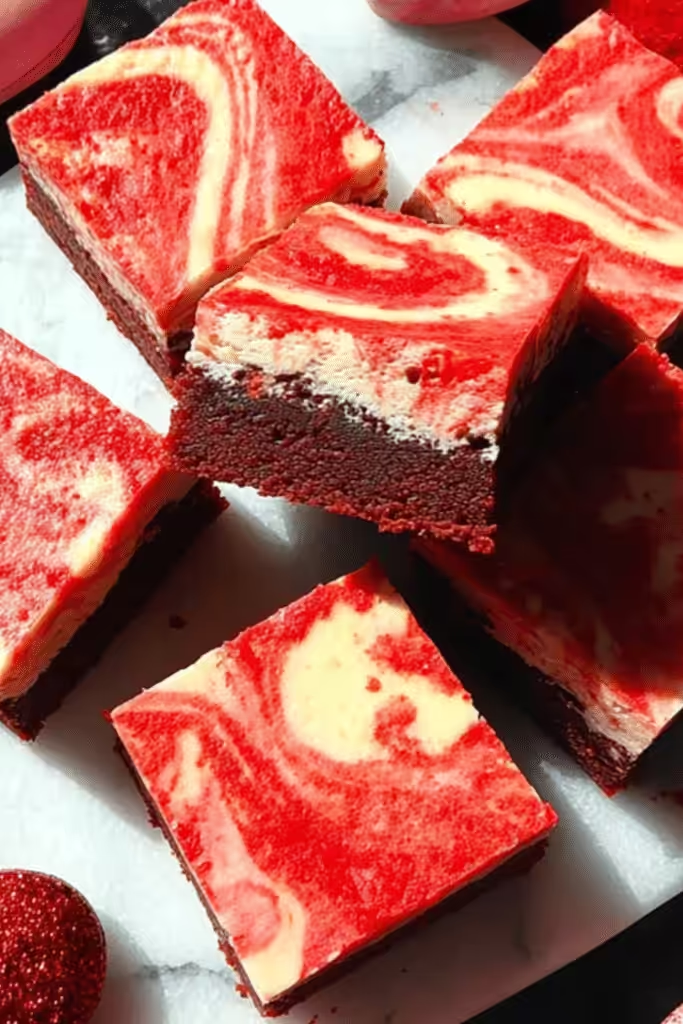
There’s no better way to celebrate love than with a pan of Valentine’s Red Velvet Cheesecake Bars. These bars combine the rich cocoa flavor of red velvet with the smooth creaminess of cheesecake — a perfect balance of texture, color, and indulgence. With a chocolatey Oreo crust and a luscious swirl of velvety red and creamy white filling, this dessert is as beautiful as it is delicious. Whether you’re baking for your partner, friends, or family, these bars are a surefire way to sweeten Valentine’s Day.
Why You’ll Fall in Love with These Cheesecake Bars
What makes Valentine’s Red Velvet Cheesecake Bars irresistible is their combination of simplicity and sophistication. The recipe is straightforward enough for beginners but impressive enough for a festive dessert spread. The Oreo crust adds crunch and a deep chocolate note, while the creamy filling delivers the smooth, tangy flavor of classic cheesecake. Even better, they’re easy to make ahead, so you can focus on your Valentine’s plans instead of last-minute baking.
What You’ll Need to Make Valentine’s Red Velvet Cheesecake Bars
Each ingredient plays an essential role in creating the perfect texture and flavor balance in these red velvet cheesecake bars.
• Oreos: Provide a deep chocolate base that complements the tangy cheesecake filling.
• Unsalted butter: Binds the Oreo crumbs and adds richness to the crust.
• Cream cheese: The foundation of the creamy cheesecake texture.
• Granulated sugar: Adds sweetness and balances the tang of the cream cheese.
• Eggs: Bind the filling while keeping it smooth and velvety.
• Vanilla extract: Enhances flavor depth and adds warmth.
• Salt: Balances sweetness and sharpens the overall flavor.
• Heavy cream: Lends richness and silkiness to the cheesecake layer.
• Unsweetened cocoa powder: Provides the signature red velvet taste.
• Red food gel: Gives the dessert its vibrant, romantic hue.
Smart Ingredient Swaps for Every Baker
Not everyone has a fully stocked pantry, and that’s okay. Here are a few ways to adapt your red velvet cheesecake bars without losing their charm:
• Gluten-free Oreos: Substitute if you’re baking for someone with gluten sensitivity.
• Greek yogurt: Use in place of part of the cream cheese for a lighter texture.
• Natural beet powder: Replace artificial food coloring for a natural red hue.
• Chocolate graham crackers: Use instead of Oreos for a milder crust flavor.
• Coconut cream: A dairy-free swap that still provides richness and smoothness.
How to Make Valentine’s Red Velvet Cheesecake Bars
- Prepare the crust:
Crush the Oreos into fine crumbs using a food processor. Mix with melted butter until fully coated. Press evenly into a parchment-lined 8×8-inch pan. Bake at 350°F for 10 minutes, then cool slightly. Lower the oven temperature to 300°F. - Create the cheesecake batter:
Beat softened cream cheese until smooth and lump-free. Add sugar, then eggs one at a time, mixing slowly. Stir in vanilla extract, salt, and heavy cream until silky and combined. - Add the red velvet touch:
Remove about 1¼ cups of the batter. Mix in cocoa powder and red food gel until it reaches your desired shade of red velvet. - Assemble and swirl:
Alternate spoonfuls of the red and plain batters over the crust. Use a skewer or toothpick to gently swirl them together. For a Valentine’s twist, shape small hearts with the red batter on top. - Bake in a water bath:
Wrap the bottom of the pan in foil, set it inside a larger baking dish, and fill with about an inch of hot water. Bake for 75 minutes, or until the center is slightly jiggly but not runny. - Cool and chill:
Remove from the oven, cool for 20 minutes, then refrigerate for at least 2 hours. This step ensures a perfectly firm yet creamy texture. Slice into bars before serving.
Tips for Perfect Red Velvet Cheesecake Bars
Getting Valentine’s Red Velvet Cheesecake Bars just right is easy with a few key tricks:
• Room temperature ingredients: Cold cream cheese creates lumps — let everything sit out before mixing.
• Don’t over-mix: Too much air can cause cracks in your cheesecake.
• Perfect swirls: Limit swirling to a few gentle passes for defined marbling.
• Avoid soggy crusts: Ensure the foil wrap around the pan is tight to keep water from leaking in.
• Cool gradually: Sudden temperature changes can cause cracks; patience pays off.
Storage and Make-Ahead Tips
• Refrigerator: Store cooled bars in an airtight container for up to 5 days.
• Freezer: Wrap each bar individually in plastic and freeze for up to 2 months. Thaw in the fridge overnight before serving.
• Make-ahead: Bake the cheesecake bars 1–2 days before your event. The flavor develops beautifully over time.
Creative Variations and Pairing Ideas
• Heart-shaped portions: Use a heart-shaped cookie cutter for adorable Valentine’s Day servings.
• Fruity swirl: Add a spoonful of raspberry or strawberry puree before baking for a tangy contrast.
• White chocolate drizzle: Finish with melted white chocolate for a stunning and sweet touch.
• Toppings: Fresh berries, whipped cream, or even edible gold glitter elevate these bars into a show-stopping dessert.
Why These Bars Are Perfect for Valentine’s Day
There’s something magical about the combination of color, flavor, and texture in Valentine’s Red Velvet Cheesecake Bars. The deep red hue symbolizes romance, while the creamy cheesecake layer delivers the comfort of homemade love. They’re elegant enough for a candlelit dinner and portable enough for a Valentine’s potluck or dessert box.
If you’re looking for a dessert that captures the essence of the holiday — sweet, decadent, and made to share — these cheesecake bars are the ultimate Valentine’s treat.
Conclusion
Every bite of Valentine’s Red Velvet Cheesecake Bars brings together the perfect harmony of chocolate and creaminess — the kind of dessert that turns a simple evening into a heartfelt celebration. With their rich cocoa undertone, smooth cheesecake swirl, and striking red hue, these bars are the ultimate symbol of love in dessert form. Whether you’re baking them for your sweetheart, friends, or family, these cheesecake bars are guaranteed to impress and leave everyone asking for seconds.
Their make-ahead convenience, versatile variations, and elegant appearance make them the ideal dessert for any Valentine’s gathering. With a little care and creativity, you’ll master this romantic recipe and have a signature treat to return to year after year.
Frequently Asked Questions About Valentine’s Red Velvet Cheesecake Bars
1. How do I know when my cheesecake bars are done baking?
Your Valentine’s Red Velvet Cheesecake Bars are ready when the center is slightly jiggly but not wet. The edges should look set. Overbaking can dry out the cheesecake layer, so check after 70 minutes and use the “gentle jiggle test.”
2. Can I make Valentine’s Red Velvet Cheesecake Bars without a water bath?
Yes, but the texture will be slightly denser and may have surface cracks. To mimic the moisture of a water bath, place a pan of hot water on the lower rack of the oven while baking — this still prevents cracking and keeps the bars creamy.
3. What’s the best way to cut neat cheesecake bars?
Use a sharp knife dipped in hot water and wiped clean between each cut. This helps create smooth, bakery-style slices without smudging the red and white layers.
4. Can I customize the flavor or color of these bars?
Absolutely! You can swirl in raspberry puree for a fruity twist or swap the red dye for pink to match your theme. Try topping your red velvet cheesecake bars with chocolate ganache, whipped cream, or even edible glitter for a festive finish.
More Relevant Recipes
Print
Valentine’s Red Velvet Cheesecake Bars: A Creamy, Decadent Dessert for Romance
- Total Time: 1 hour 40 minutes
- Yield: 16 bars 1x
- Diet: Vegetarian
Description
These Valentine’s Red Velvet Cheesecake Bars feature a rich Oreo crust topped with a smooth, creamy cheesecake swirl in striking red and white hues. Perfect for Valentine’s Day or any special occasion, this easy yet elegant dessert blends the classic flavors of red velvet and cheesecake into bite-sized squares of indulgence.
Ingredients
- 35–40 Oreos: for a deep chocolate crust base
- 1/2 cup unsalted butter, melted: binds the Oreo crumbs and adds richness
- 2 (8 oz) blocks cream cheese, softened: creates a creamy, tangy filling
- 1 1/4 cups granulated sugar: sweetens the cheesecake
- 4 large eggs, room temperature: help set the cheesecake and add structure
- 1 teaspoon vanilla extract: enhances the overall flavor
- 1/4 teaspoon salt: balances the sweetness
- 1/2 cup heavy cream, room temperature: adds a silky, rich texture
- 2 tablespoons unsweetened cocoa powder: for the classic red velvet flavor
- 2–3 drops red food gel: gives the vibrant red color
Instructions
- Preheat oven to 350°F (177°C) and line an 8×8-inch square pan with parchment paper. Lightly grease and leave overhangs for easy removal. Wrap the bottom of the pan with foil for a water bath later.
- Use a food processor to crush the Oreos into fine crumbs. Mix in melted butter until evenly combined. Press the mixture into the prepared pan to form the crust. Bake for 10 minutes, then set aside. Reduce oven temperature to 300°F (149°C).
- In a large bowl, beat softened cream cheese until smooth and creamy. Add sugar and mix on low speed until blended. Add eggs one at a time, mixing gently after each addition. Stir in vanilla extract, salt, and heavy cream until smooth.
- Remove about 1 1/4 cups of batter and transfer to a small bowl. Mix in cocoa powder and red food gel to create the red velvet batter.
- Alternate spoonfuls of plain and red velvet batter over the crust. Swirl gently with a toothpick or skewer to create a marbled pattern. Optionally, shape red dollops into hearts for a festive touch.
- Place the pan inside a larger baking dish and pour about 1 inch of hot water into the outer dish for a water bath. Bake for 75 minutes, or until the center is slightly jiggly but set around the edges.
- Remove from the oven and water bath. Let cool at room temperature for 20 minutes, then refrigerate for at least 2 hours or until fully set.
- Lift the cheesecake from the pan using parchment overhangs. Slice into even squares and serve chilled.
Notes
- Ensure all ingredients, especially cream cheese and eggs, are at room temperature for a smooth batter.
- Mix gently to avoid incorporating air bubbles that can cause cracks.
- For a gluten-free version, use gluten-free Oreos or chocolate cookies.
- Store in an airtight container in the fridge for up to 5 days or freeze for up to 2 months.
- For a fruity twist, swirl in raspberry or strawberry puree before baking.
- Prep Time: 25 minutes
- Cook Time: 1 hour 15 minutes
- Category: Dessert
- Method: Baking
- Cuisine: American
Nutrition
- Serving Size: 1 bar
- Calories: 320
- Sugar: 25g
- Sodium: 180mg
- Fat: 21g
- Saturated Fat: 12g
- Unsaturated Fat: 7g
- Trans Fat: 0g
- Carbohydrates: 30g
- Fiber: 1g
- Protein: 5g
- Cholesterol: 95mg
Keywords: Valentine’s Red Velvet Cheesecake Bars, red velvet dessert, cheesecake bars, Valentine’s Day dessert, Oreo crust cheesecake, creamy cheesecake, romantic dessert