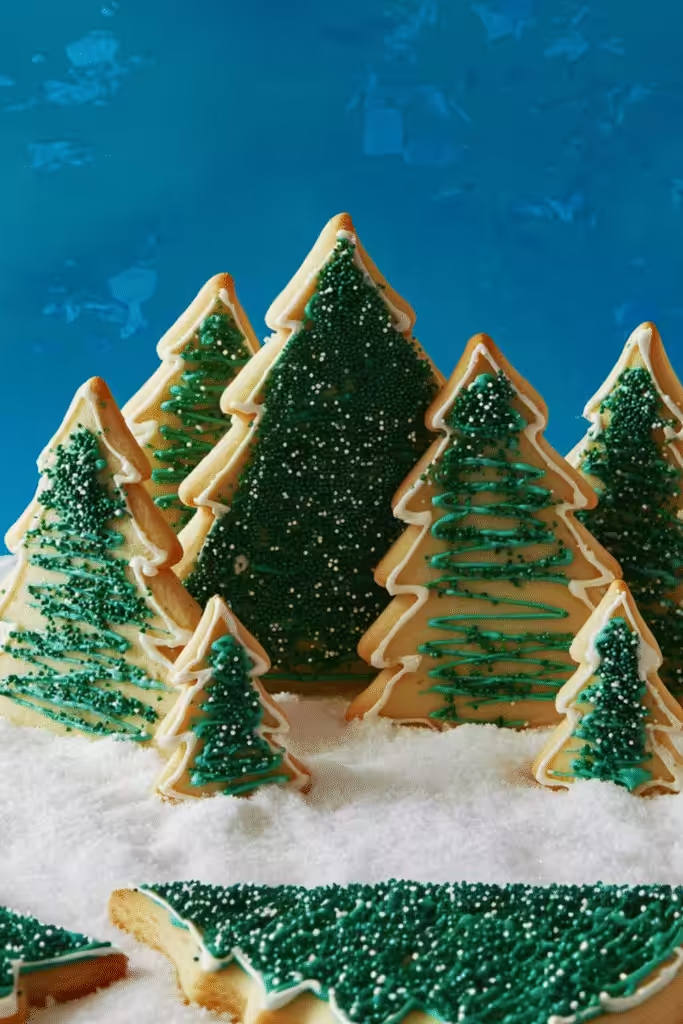
There’s no better way to bring holiday cheer to your table than with a stunning Christmas Tree Cookie Forest. This whimsical dessert combines buttery sugar cookies, glossy green royal icing, and snowy white sprinkles to create an edible winter wonderland. Perfect for family gatherings, cookie exchanges, or as a festive edible decoration, these cookies not only taste divine but also look like a handcrafted piece of holiday art.
The Magic Behind This Christmas Tree Cookie Forest
What makes this Christmas Tree Cookie Forest so special is its blend of simplicity and charm. The dough is rich and buttery, giving you a classic sugar cookie flavor, while the forest-green icing adds a beautiful pop of color. Each cookie tree can be stacked or arranged in a forest display, making it a creative and interactive holiday baking project for families. The best part? They’re vegetarian-friendly and ideal for making ahead during the busy Christmas season.
Ingredients That Bring the Forest to Life
• Unsalted Butter: Provides a rich, creamy base that gives the cookies their tender crumb and buttery aroma.
• Large Eggs: Help bind the dough and add moisture for a smooth, pliable texture.
• All-Purpose Flour: Forms the structural foundation of the cookies, ensuring they hold their tree shape perfectly.
• Pure Vanilla Extract: Adds warmth and enhances the sweet holiday aroma.
• Confectioners’ Sugar: Sweetens the dough while giving it a melt-in-your-mouth quality.
• Meringue Powder: Essential for creating sturdy royal icing that hardens beautifully for decorating.
• Baking Soda: Provides subtle lift to the cookies, preventing them from being too dense.
• Fine Salt: Balances sweetness and enhances all other flavors.
• Granulated Sugar: Adds texture and caramelization during baking.
• Forest Green Gel Food Coloring: Gives the icing its signature deep evergreen hue.
• White Sprinkles: Mimic freshly fallen snow and add sparkle to your cookie forest.
Smart Ingredient Swaps for Every Baker
If you’re missing an ingredient or want to adapt this Christmas Tree Cookie Forest for dietary needs, try these easy swaps:
• Vegan Butter or Coconut Oil: Perfect for a dairy-free version without losing texture.
• Almond or Lemon Extract: Swap in for vanilla to give your cookies a more distinct festive flavor.
• Natural Food Coloring: Spinach or matcha powder can offer a plant-based green alternative.
• Gluten-Free Flour Blend: Replace all-purpose flour for a gluten-free version that’s just as delightful.
How to Build Your Christmas Tree Cookie Forest
- Prepare the Dough: Cream butter and sugars until light and fluffy. Beat in eggs and vanilla. Gradually add flour, baking soda, and salt until a soft dough forms.
- Chill and Roll: Wrap the dough in plastic wrap and chill for at least 1 hour. Roll out on a floured surface and cut into various tree shapes.
- Bake the Cookies: Place cutouts on a parchment-lined tray and bake at 350°F until edges turn light golden. Cool completely.
- Make the Icing: Combine confectioners’ sugar, meringue powder, and water. Beat until glossy, then tint with forest green coloring. Adjust consistency as needed.
- Decorate and Assemble: Pipe icing onto cookies, then layer different sizes to create 3D tree stacks. Add white sprinkles for a snowy touch.
- Let Dry: Allow the icing to harden completely before arranging your cookie forest on a platter or cake board.
Pro Tips for Perfect Holiday Cookies
• Chill the dough well to keep cookie shapes crisp and defined.
• Use gel coloring rather than liquid to avoid thinning your icing.
• Allow icing layers to dry between applications for neat, defined details.
• Store in airtight containers to maintain freshness up to one week.
• Make extra royal icing for touch-ups and forest “snow.”
Creative Variations and Pairings
Your Christmas Tree Cookie Forest can easily adapt to different themes:
• White Forest Trees: Use white icing with silver pearls for a frosty, elegant look.
• Chocolate Forest: Add cocoa powder to the dough for rich chocolate cookie trees.
• Edible Snow Scene: Dust the platter with confectioners’ sugar for a wintry effect.
• Gift-Worthy Treats: Wrap individual trees in clear cellophane with a holiday ribbon.
Pair these cookies with hot cocoa, mulled wine, or peppermint tea for the perfect cozy pairing.
Celebrate the Spirit of Christmas Baking
The Christmas Tree Cookie Forest isn’t just a recipe—it’s an experience that captures the heart of the holiday season. It invites creativity, family connection, and joy through baking. Whether you’re crafting a centerpiece for your Christmas table or creating edible gifts, these cookies symbolize the warmth and beauty of festive traditions.
Bringing Your Christmas Tree Cookie Forest to Life
Creating a Christmas Tree Cookie Forest is more than baking — it’s an artistic journey that turns your kitchen into a festive workshop. Every cookie layer, swirl of icing, and sprinkle of sugar snow tells a story of love, tradition, and creativity. Whether you’re an experienced baker or a beginner looking to add sparkle to your holiday treats, this project offers the perfect balance between fun and flavor. Display your edible forest as a holiday centerpiece, gift it to friends, or share it at a Christmas cookie exchange — the result is sure to enchant everyone.
Final Thoughts: A Sweet Tradition to Treasure
Your Christmas Tree Cookie Forest will become a holiday tradition that brings smiles year after year. The combination of buttery cookies, smooth royal icing, and delicate decorations captures the true spirit of Christmas baking — joyful, comforting, and beautifully nostalgic. Don’t be afraid to personalize your forest with unique colors, edible glitter, or themed decorations. After all, the magic of Christmas is found in the memories made along the way — and this cookie forest is the perfect way to make them.
Frequently Asked Questions About Christmas Tree Cookie Forest
1. How far in advance can I make the Christmas Tree Cookie Forest?
You can bake the cookies up to five days ahead and store them in an airtight container. Decorate them one to two days before serving to keep the icing fresh and glossy.
2. Can I freeze the cookie dough or baked cookies?
Yes. Wrap the dough tightly in plastic and freeze for up to three months. Baked cookies can also be frozen undecorated; thaw completely before icing to avoid moisture buildup.
3. What can I use instead of meringue powder for the royal icing?
You can substitute with pasteurized egg whites (2 tablespoons per batch of icing) or use a simple powdered sugar glaze for a softer finish.
4. How do I keep the icing from running off the cookies?
Check the icing consistency — it should hold a ribbon on the surface for about 5–8 seconds when drizzled back into the bowl. Add more confectioners’ sugar if it’s too thin.
More Relevant Recipes
- Miss Brown’s Praline Cookies
- Katie Lee’s Chocolate-Peppermint Whoopie
- Cherry Pistachio Pinwheel Cookies

Christmas Tree Cookie Forest: A Festive Holiday Centerpiece Dessert
- Total Time: 10 hours (includes cooling and decorating)
- Yield: 6 tree cookies (assembled forest display) 1x
- Diet: Vegetarian
Description
The Christmas Tree Cookie Forest is a festive holiday dessert featuring buttery sugar cookies shaped like Christmas trees, layered with forest-green royal icing, and sprinkled with edible snow. Perfect as a centerpiece, gift, or treat, this recipe blends creativity with classic holiday flavors to create an edible winter wonderland.
Ingredients
- 3 sticks (24 tablespoons) unsalted butter: adds rich, creamy flavor and tenderness
- 3 large eggs: binds the dough and provides structure
- 4 3/4 cups all-purpose flour, plus more for dusting: gives body and stability to cookies
- 2 teaspoons pure vanilla extract: enhances the sweet aroma
- 1/2 cup confectioners’ sugar: adds sweetness and smooth texture to dough
- 1 pound (about 3 1/2 cups) confectioners’ sugar, plus more for thickening and decorating: forms the royal icing and snowy effect
- 2 tablespoons meringue powder: helps icing harden with a glossy finish
- 1/4 teaspoon baking soda: provides gentle lift
- 1/4 teaspoon fine salt: balances sweetness
- 1 cup granulated sugar: creates crisp edges and slight caramelization
- Forest green gel food coloring: gives icing a vibrant holiday hue
- White sprinkles: mimic snow for decoration
Instructions
- Cream butter and both sugars in a large bowl until light and fluffy.
- Beat in eggs one at a time, followed by vanilla extract.
- In another bowl, whisk flour, baking soda, and salt. Gradually add to wet ingredients until dough forms.
- Wrap dough in plastic wrap and refrigerate for at least 1 hour.
- Preheat oven to 350°F (175°C). Roll out chilled dough on a floured surface and cut into tree shapes.
- Place cookies on parchment-lined baking sheets and bake 10–12 minutes or until edges are lightly golden.
- Cool completely on wire racks before decorating.
- For icing, combine confectioners’ sugar, meringue powder, and water. Beat until glossy and stiff peaks form.
- Tint icing with forest green gel coloring; adjust consistency with more sugar or water as needed.
- Pipe icing onto cookies, layering different sizes to create stacked trees.
- Decorate with white sprinkles and let icing set completely before serving or displaying.
Notes
- Chill dough for cleaner edges and easier cutting.
- Use gel food coloring to maintain icing texture.
- Store cookies in an airtight container up to 1 week.
- Freeze undecorated cookies for up to 3 months.
- Perfect for gifting, cookie exchanges, or edible centerpieces.
- Prep Time: 2 hours (including chilling and decorating)
- Cook Time: 12 minutes per batch
- Category: Dessert
- Method: Baking and Decorating
- Cuisine: American
Nutrition
- Serving Size: 1 tree cookie
- Calories: 1294
- Sugar: 110 g
- Sodium: 200 mg
- Fat: 49 g
- Saturated Fat: 30 g
- Unsaturated Fat: 17 g
- Trans Fat: 1 g
- Carbohydrates: 201 g
- Fiber: 2 g
- Protein: 14 g
- Cholesterol: 160 mg
Keywords: Christmas Tree Cookie Forest, Christmas cookies, holiday desserts, sugar cookies, royal icing, edible centerpiece, festive cookie recipe, Christmas baking ideas